虚拟网卡解析

通过 ip link 命令可以创建多种类型的虚拟网络设备,在 man ip link中可以得知有以下类型的device:

1
2
3
4
5
6
7
8
9
10
11
12
13
14
15
16
17
18
19
20
21
22
23
24
25
26
27
28
29
30
31
32
33
34
35
36
37
38
39
40
41
42
43
44
45
46
47
48
49
50
51
bridge - Ethernet Bridge device

bond - Bonding device can - Controller Area Network interface

dummy - Dummy network interface

hsr - High-availability Seamless Redundancy device

ifb - Intermediate Functional Block device

ipoib - IP over Infiniband device

macvlan - Virtual interface base on link layer address (MAC)

macvtap - Virtual interface based on link layer address (MAC) and TAP.

vcan - Virtual Controller Area Network interface

veth - Virtual ethernet interface

vlan - 802.1q tagged virtual LAN interface

vxlan - Virtual eXtended LAN

ip6tnl - Virtual tunnel interface IPv4|IPv6 over IPv6

ipip - Virtual tunnel interface IPv4 over IPv4

sit - Virtual tunnel interface IPv6 over IPv4

gre - Virtual tunnel interface GRE over IPv4

gretap - Virtual L2 tunnel interface GRE over IPv4

ip6gre - Virtual tunnel interface GRE over IPv6

ip6gretap - Virtual L2 tunnel interface GRE over IPv6

vti - Virtual tunnel interface

nlmon - Netlink monitoring device

ipvlan - Interface for L3 (IPv6/IPv4) based VLANs

lowpan - Interface for 6LoWPAN (IPv6) over IEEE 802.15.4 / Bluetooth

geneve - GEneric NEtwork Virtualization Encapsulation

macsec - Interface for IEEE 802.1AE MAC Security (MACsec)

vrf - Interface for L3 VRF domains

在kubernetes容器网络虚拟化中,常用的网卡类型包括macvlan, ipvlan, veth, ipip, vlan, macvtap, bridge等。通过 ip link add命令能够快速的创建一个虚拟网卡。

1
ip link add ethx type dummy

macvlan

macvlan 本身是 linxu kernel 模块,其功能是允许在同一个物理网卡上配置多个 MAC 地址,即多个 interface,每个 interface 可以配置自己的 IP。macvlan 本质上是一种网卡虚拟化技术(最大优点是性能极好)

可以在linux命令行执行lsmod | grep macvlan 查看当前内核是否加载了该driver;如果没有查看到,可以通过modprobe macvlan来载入,然后重新查看。内核代码路径/drivers/net/macvlan.c

Macvlan 允许你在主机的一个网络接口上配置多个虚拟的网络接口,这些网络 interface 有自己独立的 MAC 地址,也可以配置上 IP 地址进行通信。Macvlan 下的虚拟机或者容器网络和主机在同一个网段中,共享同一个广播域。Macvlan 和 Bridge 比较相似,但因为它省去了 Bridge 的存在,所以配置和调试起来比较简单,而且效率也相对高。除此之外,Macvlan 自身也完美支持 VLAN

macvlan的工作方式如下:

macvlan

macvlan工作原理

在macvlan中,实体网卡称为父接口(parent interface), 创建出来的虚拟网卡称为子接口(sub interface),其中子接口无法与父接口通讯 (带有子接口 的 VM 或容器无法与 host 直接通讯, 这是因为在macvlan模式设计的时候为了安全而禁止了宿主机和容器直接通信),如果vm或者容器需要与host通讯,就必须额外建立一个 sub interface给 host 用。

macvlan 模式

macvlan支持三种模式,bridge、vepa、private,在创建的时候设置mode XXX

Bridge模式:属于同一个parent接口的macvlan接口之间挂到同一个bridge上,可以二层互通(macvlan接口都无法与parent 接口互通)。

bridge模式

VPEA模式:所有接口的流量都需要到外部switch才能够到达其他接口。

vpea mode

Private模式:接口只接受发送给自己MAC地址的报文。

private mode

创建macvlan

1
2
3
4
5
6
7
8
9
10
11
12
13
14
15
16
17
18
19
20
21
22
23
24
25
26
27
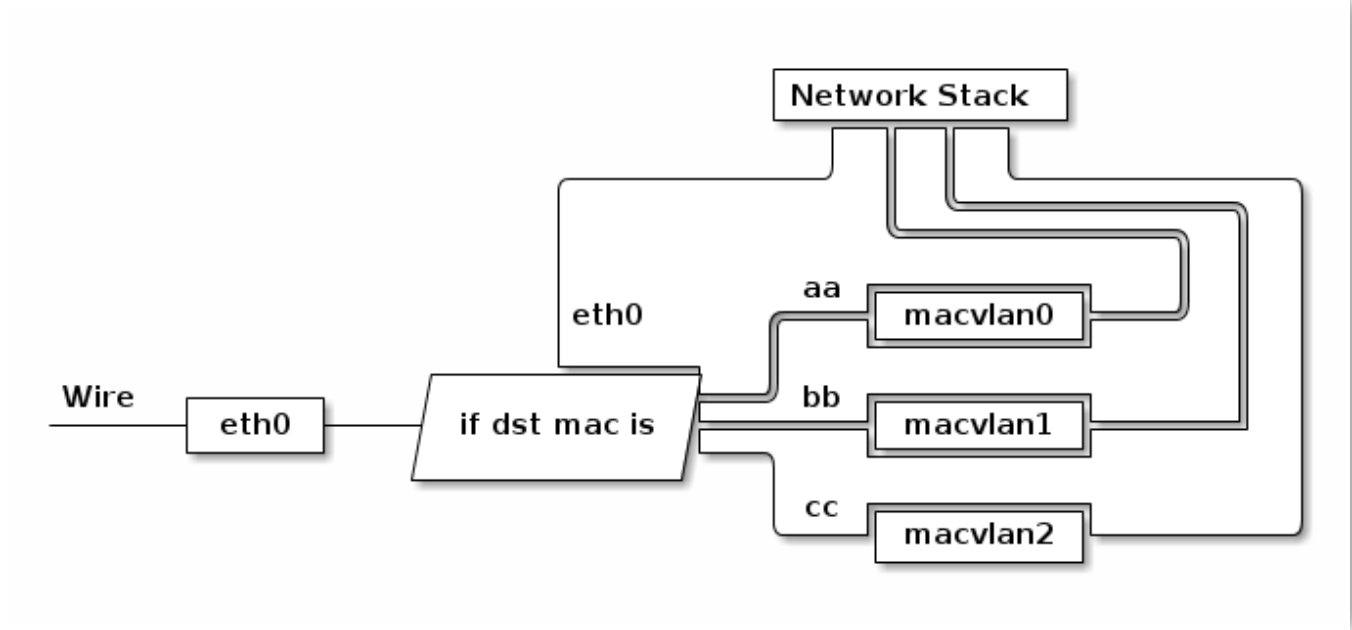
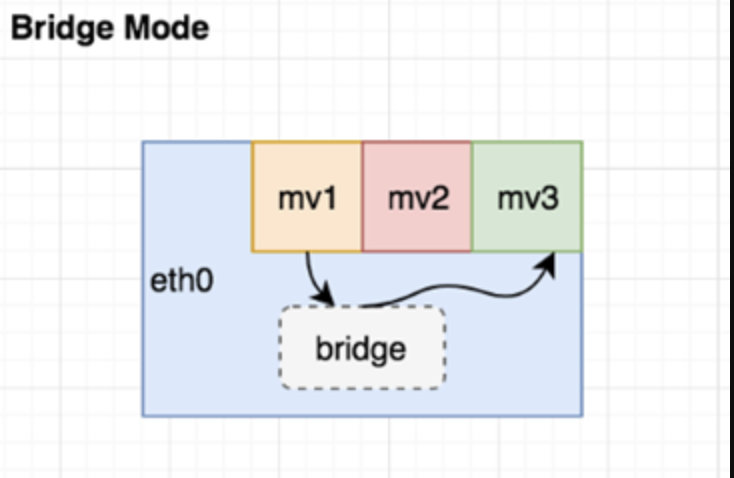
# 创建macvlan 网卡
ip link add link eth0 name mac1@eth0 type macvlan mode bridge
ip link add link eth0 name mac2@eth0 type macvlan mode bridge

# 创建命名空间
ip netns add ns1
ip netns add ns2

# 把虚拟网卡移入到命名空间
ip link set mac1@eth0 netns ns1
ip link set mac2@eth0 netns ns2

# 进入netns为虚拟网卡分配ip地址
ip netns exec ns1 ip addr add 192.168.0.100/24 dev mac1@eth0
ip netns exec ns2 ip addr add 192.168.0.200/24 dev mac2@eth0

# 设置虚拟网卡状态为up
ip netns exec ns1 ip link set mac1@eth0 up
ip netns exec ns2 ip link set mac2@eth0 up

# 创建macvlan网卡,不移入到命名空间,并且添加路由
ip link add link eth0 name mac3@eth0 type macvlan mode bridge
ip addr add 192.168.0.150/24 dev mac3@eth0
ip link set mac3@eth0 up

ip route add 192.168.0.100/32 dev mac3@eth0
ip route add 192.168.0.200/32 dev mac3@eth0
验证macvlan
1
2
3
4
5
6
7
8
9
10
11
12
13
14
15
16
17
18
19
20
21
22
23
24
25
26
27
28
29
30
31
32
33
34
35
36
37
38
39
40
41
42
43
# 查看ip地址
[root@master ~]# ip netns exec ns2 ifconfig
mac2@eth0: flags=4163<UP,BROADCAST,RUNNING,MULTICAST> mtu 1500
inet 192.168.0.200 netmask 255.255.255.0 broadcast 0.0.0.0
inet6 fe80::1860:edff:fecd:43c1 prefixlen 64 scopeid 0x20<link>
ether 1a:60:ed:cd:43:c1 txqueuelen 1000 (Ethernet)
RX packets 5 bytes 322 (322.0 B)
RX errors 0 dropped 0 overruns 0 frame 0
TX packets 13 bytes 1006 (1006.0 B)
TX errors 0 dropped 0 overruns 0 carrier 0 collisions 0

# ping ns1中的网卡
[root@master ~]# ip netns exec ns2 ping -c 5 192.168.0.100
PING 192.168.0.100 (192.168.0.100) 56(84) bytes of data.
64 bytes from 192.168.0.100: icmp_seq=1 ttl=64 time=0.090 ms
64 bytes from 192.168.0.100: icmp_seq=2 ttl=64 time=0.044 ms
64 bytes from 192.168.0.100: icmp_seq=3 ttl=64 time=0.052 ms
64 bytes from 192.168.0.100: icmp_seq=4 ttl=64 time=0.080 ms
64 bytes from 192.168.0.100: icmp_seq=5 ttl=64 time=0.053 ms

--- 192.168.0.100 ping statistics ---
5 packets transmitted, 5 received, 0% packet loss, time 4088ms
rtt min/avg/max/mdev = 0.044/0.063/0.090/0.020 ms

# 无法ping通宿主机
[root@master ~]# ip netns exec ns2 ping 192.168.0.171
PING 192.168.0.171 (192.168.0.171) 56(84) bytes of data.
^X^C
--- 192.168.0.171 ping statistics ---
4 packets transmitted, 0 received, 100% packet loss, time 3071ms

# 能够ping通宿主机上的mac3@eth0虚拟网卡
[root@master ~]# ip netns exec ns2 ping -c 5 192.168.0.150
PING 192.168.0.150 (192.168.0.150) 56(84) bytes of data.
64 bytes from 192.168.0.150: icmp_seq=1 ttl=64 time=0.063 ms
64 bytes from 192.168.0.150: icmp_seq=2 ttl=64 time=0.071 ms
64 bytes from 192.168.0.150: icmp_seq=3 ttl=64 time=0.062 ms
64 bytes from 192.168.0.150: icmp_seq=4 ttl=64 time=0.079 ms
64 bytes from 192.168.0.150: icmp_seq=5 ttl=64 time=0.090 ms

--- 192.168.0.150 ping statistics ---
5 packets transmitted, 5 received, 0% packet loss, time 4104ms
rtt min/avg/max/mdev = 0.062/0.073/0.090/0.010 ms
macvlan 环境清理
1
2
3
ip netns del ns1
ip netns del ns2
ip link del mac3@eth0

ipvlan

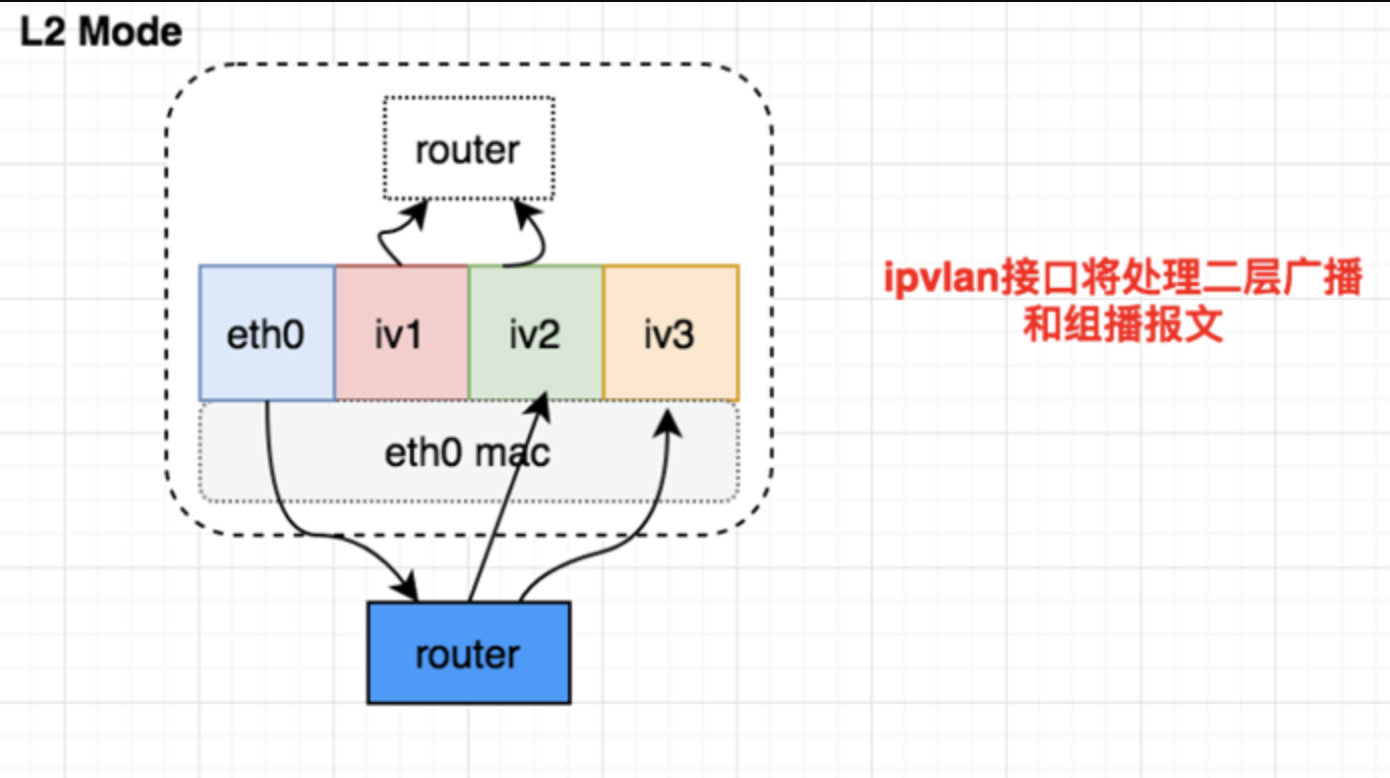
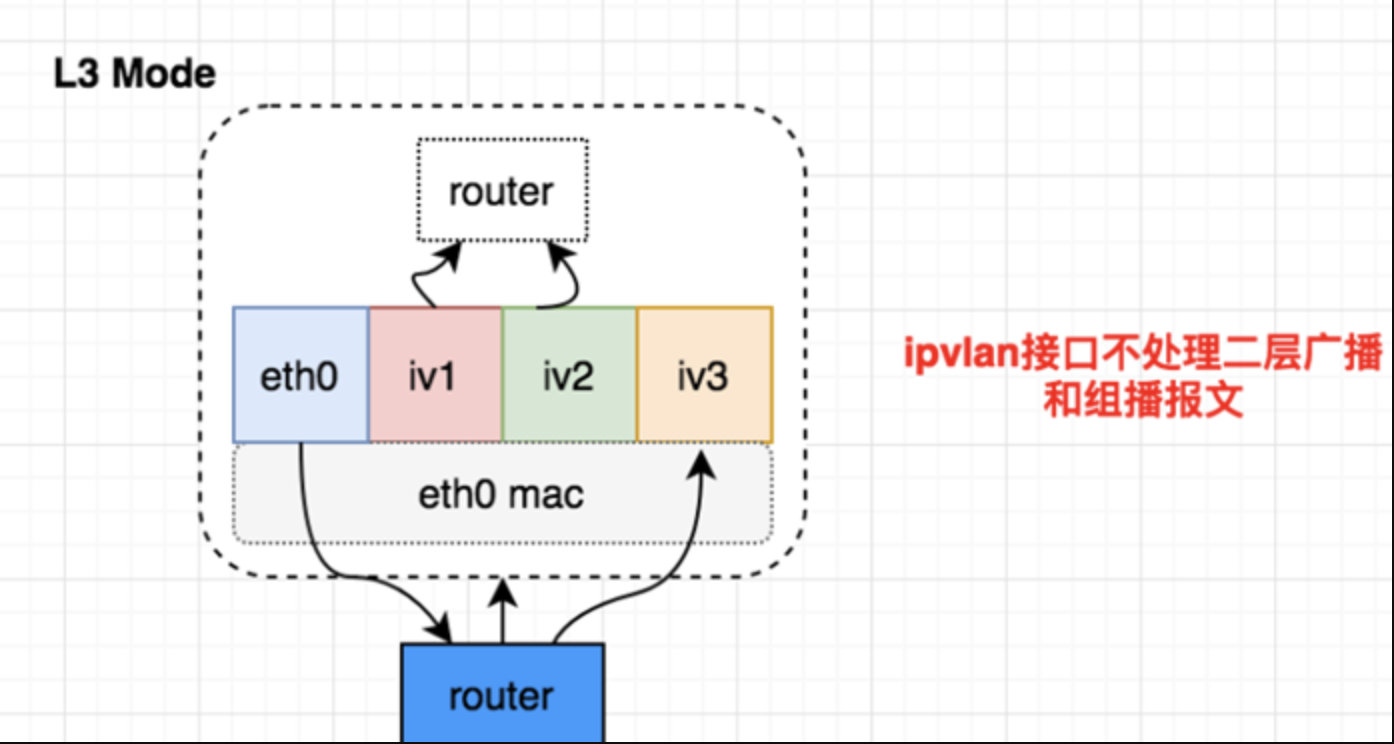
IPVlan 和 macvlan 类似,都是从一个主机接口虚拟出多个虚拟网络接口。一个重要的区别就是所有的虚拟接口都有相同的 macv 地址,而拥有不同的 ip 地址。因为所有的虚拟接口要共享 mac 地址,所以有些需要注意的地方:

DHCP 协议分配 ip 的时候一般会用 mac 地址作为机器的标识。这个情况下,客户端动态获取 ip 的时候需要配置唯一的 ClientID 字段,并且 DHCP server 也要正确配置使用该字段作为机器标识,而不是使用 mac 地址

Ipvlan 是 linux kernel 比较新的特性,linux kernel 3.19 开始支持 ipvlan,但是比较稳定推荐的版本是 >=4.2

ipvlan模式

L2模式:ipvlan L2 模式和 macvlan bridge 模式工作原理很相似,父接口作为交换机来转发子接口的数据。同一个网络的子接口可以通过父接口来转发数据,而如果想发送到其他网络,报文则会通过父接口的路由转发出去。

L2 模式

L3模式: ipvlan 有点像路由器的功能,它在各个虚拟网络和主机网络之间进行不同网络报文的路由转发工作。只要父接口相同,即使虚拟机/容器不在同一个网络,也可以互相 ping 通对方,因为 ipvlan 会在中间做报文的转发工作。

L3 模式

创建ipvlan
1
2
3
4
5
6
7
8
9
10
11
12
13
14
15
16
17
18
19
20
21
22
23
24
25
26
27
28
# 创建 ipvlan 虚拟网卡
ip link add link eth0 ipvlan1@eth0 type ipvlan mode l3
ip link add link eth0 ipvlan2@eth0 type ipvlan mode l3

# 创建命名空间
ip netns add ns1
ip netns add ns2

# 把ipvlan 移入到命名空间
ip link set ipvlan1@eth0 netns ns1
ip link set ipvlan2@eth0 netns ns2

# 配置虚拟网卡ip地址
ip netns exec ns1 ip addr add 192.168.0.100/24 dev ipvlan1@eth0
ip netns exec ns2 ip addr add 192.168.0.200/24 dev ipvlan2@eth0

# 设置虚拟网卡为up状态
ip netns exec ns1 ip link set ipvlan1@eth0 up
ip netns exec ns2 ip link set ipvlan2@eth0 up

# 创建虚拟网卡,放置在宿主机
ip link add link eth0 ipvlan3@eth0 type ipvlan mode l3
ip addr add 192.168.0.150/24 dev ipvlan3@eth0
ip link set ipvlan3@eth0 up

# 添加路由
ip route add 192.168.0.100/32 dev ipvlan3@eth0
ip route add 192.168.0.200/32 dev ipvlan3@eth0
验证ipvlan
1
2
3
4
5
6
7
8
9
10
11
12
13
14
15
16
17
18
19
20
21
22
23
24
25
26
27
28
29
30
31
32
33
34
35
36
37
38
39
40
41
42
43
44
# 查看ip地址
[root@master ~]# ip netns exec ns1 ifconfig
ipvlan1@eth0: flags=4291<UP,BROADCAST,RUNNING,NOARP,MULTICAST> mtu 1500
inet 192.168.0.100 netmask 255.255.255.0 broadcast 0.0.0.0
inet6 fe80::16:3e00:10d:30c7 prefixlen 64 scopeid 0x20<link>
ether 00:16:3e:0d:30:c7 txqueuelen 1000 (Ethernet)
RX packets 3 bytes 336 (336.0 B)
RX errors 0 dropped 0 overruns 0 frame 0
TX packets 8 bytes 784 (784.0 B)
TX errors 0 dropped 5 overruns 0 carrier 0 collisions 0

# 能ping通 192.168.0.200
[root@master ~]# ip netns exec ns1 ping -c 5 192.168.0.200
PING 192.168.0.200 (192.168.0.200) 56(84) bytes of data.
64 bytes from 192.168.0.200: icmp_seq=1 ttl=64 time=0.056 ms
64 bytes from 192.168.0.200: icmp_seq=2 ttl=64 time=0.055 ms
64 bytes from 192.168.0.200: icmp_seq=3 ttl=64 time=0.045 ms
64 bytes from 192.168.0.200: icmp_seq=4 ttl=64 time=0.046 ms
64 bytes from 192.168.0.200: icmp_seq=5 ttl=64 time=0.055 ms

--- 192.168.0.200 ping statistics ---
5 packets transmitted, 5 received, 0% packet loss, time 4126ms
rtt min/avg/max/mdev = 0.045/0.051/0.056/0.008 ms

# 无法ping通宿主机
[root@master ~]# ip netns exec ns1 ping -c 5 192.168.0.171
PING 192.168.0.171 (192.168.0.171) 56(84) bytes of data.


--- 192.168.0.171 ping statistics ---
5 packets transmitted, 0 received, 100% packet loss, time 4080ms

# 能ping通宿主机上的ipvlan3@eth0
[root@master ~]# ip netns exec ns1 ping -c 5 192.168.0.150
PING 192.168.0.150 (192.168.0.150) 56(84) bytes of data.
64 bytes from 192.168.0.150: icmp_seq=1 ttl=64 time=0.100 ms
64 bytes from 192.168.0.150: icmp_seq=2 ttl=64 time=0.088 ms
64 bytes from 192.168.0.150: icmp_seq=3 ttl=64 time=0.067 ms
64 bytes from 192.168.0.150: icmp_seq=4 ttl=64 time=0.091 ms
64 bytes from 192.168.0.150: icmp_seq=5 ttl=64 time=0.088 ms

--- 192.168.0.150 ping statistics ---
5 packets transmitted, 5 received, 0% packet loss, time 4122ms
rtt min/avg/max/mdev = 0.067/0.086/0.100/0.016 ms
ipvlan 环境清理
1
2
3
ip netns del ns1
ip netns del ns2
ip link del ipvlan3@eth0

macvtap

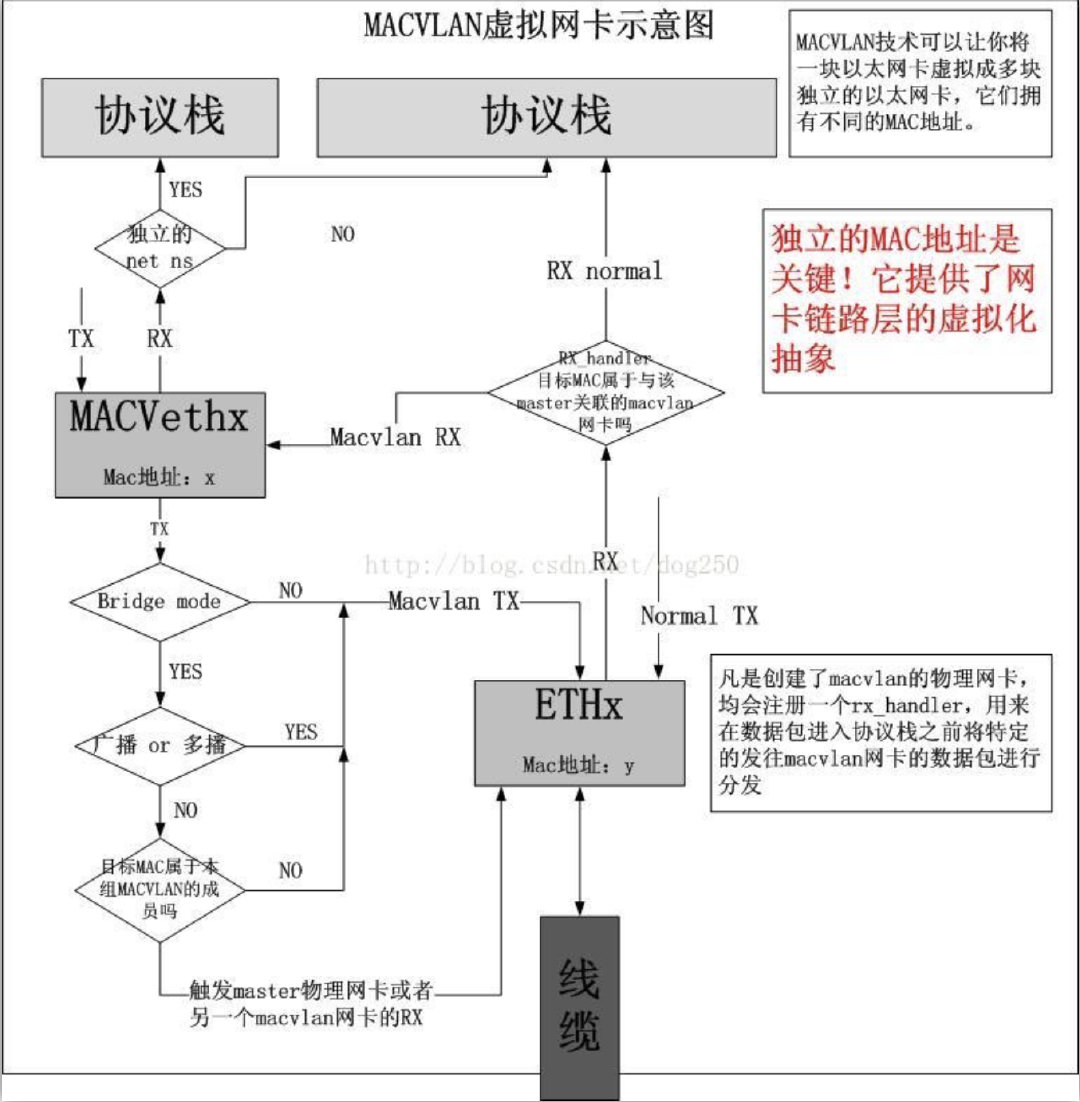
MACVTAP 是对 MACVLAN的改进,把 MACVLAN 与 TAP 设备的特点综合一下,使用 MACVLAN 的方式收发数据包,但是收到的包不交给 network stack 处理,而是生成一个 /dev/tapX 文件,交给这个文件。由于 MACVLAN 是工作在 MAC 层的,所以 MACVTAP 也只能工作在 MAC 层。

macvtap

tun

Tun是Linux系统里的虚拟网络设备, TUN设备模拟网络层设备(network layer),处理三层报文,IP报文等,用于将报文注入到网络协议栈

tun

应用程序(app)可以从物理网卡上读写报文,经过处理后通过TUN回送,或者从TUN读取报文处理后经物理网卡送出。

tun

dummy

dummy网卡是内核虚拟出来的网卡,没有实际的用途,要创建一个dummy类型的网卡只需要通过如下命令:

1
2
3
4
5
6
7
8
[root@master ~]# ip link add mydummy type dummy
[root@master ~]# ifconfig dummy
dummy0: flags=130<BROADCAST,NOARP> mtu 1500
ether 12:cf:8a:87:81:ed txqueuelen 1000 (Ethernet)
RX packets 0 bytes 0 (0.0 B)
RX errors 0 dropped 0 overruns 0 frame 0
TX packets 0 bytes 0 (0.0 B)
TX errors 0 dropped 0 overruns 0 carrier 0 collisions 0

创建dummy网卡后可以为dummy网卡设置ip地址:

1
2
3
4
5
6
7
8
9
[root@master ~]# ip addr add 192.168.200.200/24 dev mydummy
[root@master ~]# ifconfig mydummy
mydummy: flags=130<BROADCAST,NOARP> mtu 1500
inet 192.168.200.200 netmask 255.255.255.0 broadcast 0.0.0.0
ether ae:de:93:50:84:2f txqueuelen 1000 (Ethernet)
RX packets 0 bytes 0 (0.0 B)
RX errors 0 dropped 0 overruns 0 frame 0
TX packets 0 bytes 0 (0.0 B)
TX errors 0 dropped 0 overruns 0 carrier 0 collisions 0

参考文档